
Hoverwatch Review 2026: Best Phone Tracker for Android with Free Trial
Spy apps have become increasingly popular in recent years, as people seek ways to monitor digital activity on target devices. With the rise of cyberbullying, parents and employers are looking for ways to keep tabs on their children’s or employees’ online behavior. Hoverwatch is one of them helpful tools.
Hoverwatch is a popular spy app that has gained significant attention in recent years. With its wide range of features, Hoverwatch allows you to track various activities on a target device, including calls, messages, social media activity, location, and more.
In this article, we’ll review Hoverwatch and examine its various features, ease of use, reliability, and overall value for money.
With that said, let’s get started and see if Hoverwatch is one of the best phone tracker options.
In many life situations, we worry about the welfare of our families, kids’ safety, and the effectiveness of family business. Android users think who their spouses are talking with and what takes their kids long to get home. Are our employees following the company’s rules?
Many situations may threaten our personal and professional lives. We need to avoid them using Android/iOS spy applications that provide complete access to the target mobile device. With the help of phone trackers, people stay aware of various activities running on the target device. Hoverwatch Android phone spy software is the right solution.
Quick Review
[su_table responsive=”yes” alternate=”no”]
| Our rating | Our rating: 8.9 / 10 |
| Compatibility | Windows, Mac, Android, iOS |
| Live Demo/Free Trial | Yes/3-day free trial |
| Key Features | SMS recording, Remote camera, Location tracking |
| Jailbreak/rooting required | No |
| Link | Learn more |
[/su_table]
What is Hoverwatch & When Do You Need It?
Hoverwatch is a multifunctional spy app that can be used for monitoring Android cell phones and macOS or Windows computers.
While it essentially works like many other monitoring apps, it strongly relies on screenshots to capture information as well. And this is what mainly sets it apart.
The spy app can be used for various occasions. However, its two most popular uses are:
- As a parental control app
- As an employee monitoring tool
Parental Control
The main task of any parent is to ensure the safety of their kids. And Hoverwatch allows you to easily keep a close eye on your kids’ activities.
The app lets you keep track of who your child communicates with and even constantly monitors their location.
As such, you’ll always know about your kid’s whereabouts without ever breaking a sweat. The best part is that they’ll never know you’re monitoring them.
Employee Monitoring
The Hoverwatch app can also come in handy if you’re a business owner. With the app, you can easily prevent your company’s critical information from leaking.
Once installed on your employees’ corporate phones, you can monitor all texts and calls that can jeopardize your business.
This also makes it simple to find out which employees are loyal or disloyal to your organization. And from here, taking action suddenly becomes easy.
How Does Hoverwatch Work?
Ideally, Hoverwatch’s functionality can be broken down into 3 steps. And they all apply regardless of the type of device you wish to monitor. They include:
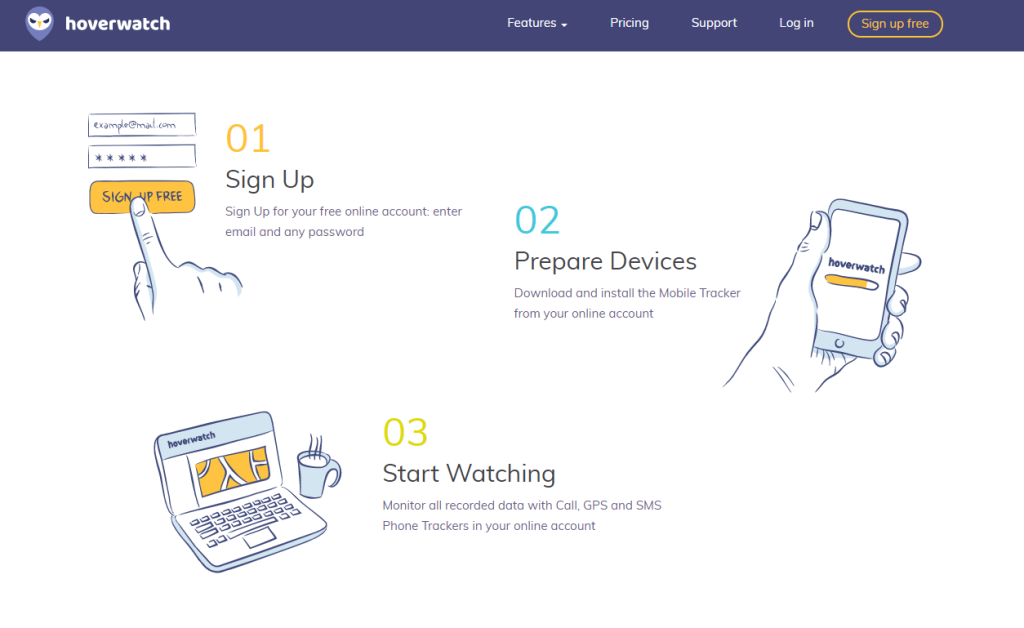
Step 1: Create a Hoverwatch account
A valid account is needed to get you started with Hoverwatch. As such, you’ll need to register for a free account then pick a subscription of choice on the Hoverwatch website.
Step 2: Install the application on a target device
You’ll need to gain access to the target device then follow a few instructions to complete the setup. Once done, Hoverwatch will begin monitoring the device.
Step 3: View reports from the dashboard
Login to your account using your credentials from Step 1 to view all data that’s been collected from the target device.
As you can tell, the app does work in a simple way. But depending on the target device, a few differences will arise, especially during installation.
How to Use Hoverwatch
Hoverwatch is a very easy app to use. Once you install the app from the Hoverwatch website on the target device, you can access all the information like chats, calls, contact details, GPS locations, and much more from the online dashboard via a laptop.
Hoverwatch App Compatibility
You can only use Hoverwatch on Android devices or PCs – Windows or Mac to be specific. This, therefore, locks out iOS users from the picture.
But regardless, Hoverwatch does pay close attention to the operating systems it is compatible with. And that is evident with how frequently it updates its apps.
In addition, it supports the latest OS versions for PCs and still works with old versions of Android.
| Operating System | Minimum Version |
| Android | Android 4.0 (Ice Cream Sandwich) |
| macOS | macOS 10.15 (Catalina) |
| Windows | Windows 10 |
Key Features of Hoverwatch
On the surface, Hoverwatch may seem to have three main features which include:
- Reports
- Locations
- Calendar
However, most of its features are simply bundled up in the Reports section. And that’s where all the magic usually happens.
In addition, we’ll also discuss Hoverwatch’s settings later on too since it’s tightly intertwined with the main features.
Reports
The first thing you’re greeted with once you log in to your Hoverwatch account is the reports page. Ideally, this is where you get a summary of all monitored activities.
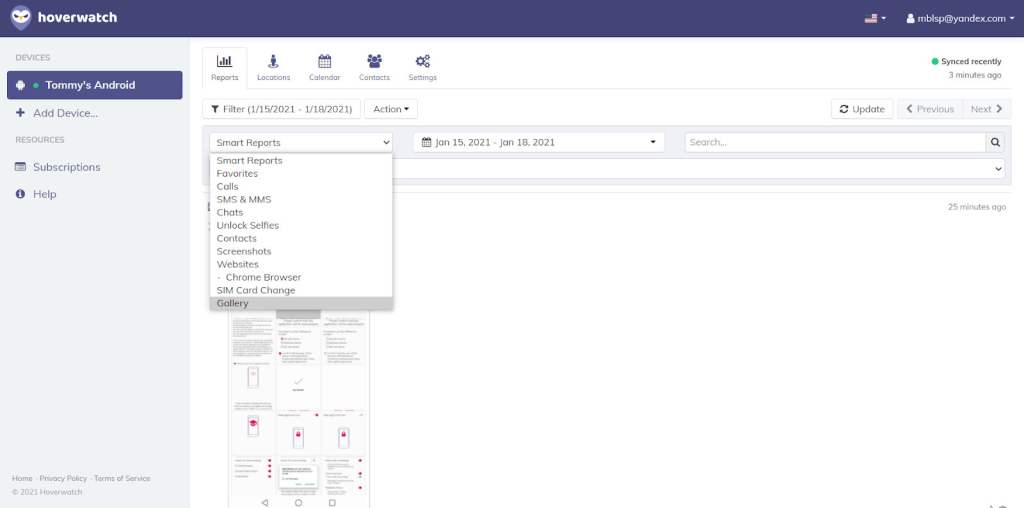
From here, you can then navigate to other sections such as:
- Calls – incoming and outgoing calls
- Contacts from the address book
- SMS & MMS
- Websites and browser history
- Gallery and media files
This is done by clicking on the “Filter” button then selecting any one of the available options underneath. By default, Hoverwatch starts with the “Smart Reports”.
In all honesty, we found the layout a bit clunky. And this was because it wasn’t always quick to navigate from one section to the other.
But either way, it was still thoughtful of Hoverwatch to include the Smart Reports first. This way, it was easy to get a summary of all the data that’s been recorded.
Calls
The first feature you’ll come across under the Reports section is the Calls feature. As you may have guessed, all outgoing and incoming calls will populate here.
Details such as the duration of the call and the date it was made are also visible on each entry.
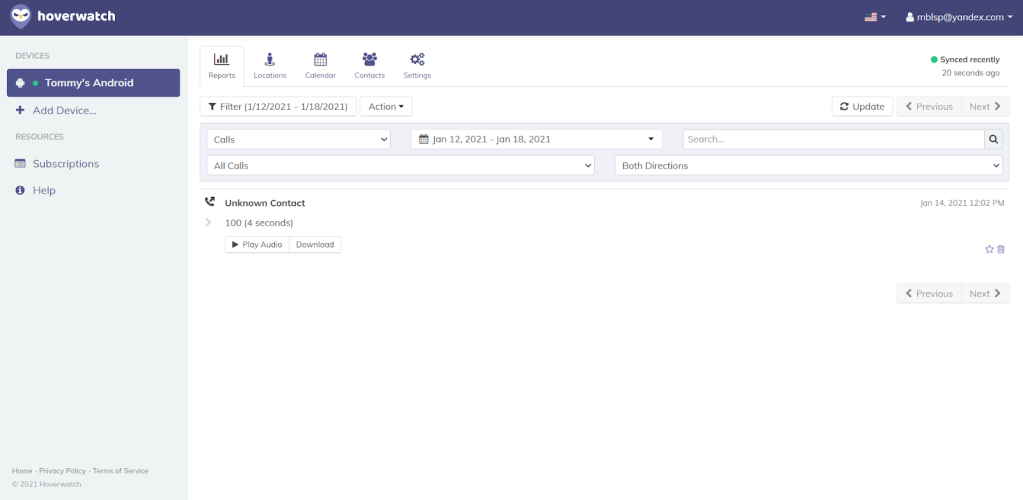
We were also particularly impressed with Hoverwatch’s filter options in the Call feature. That’s simply because it made finding call records easy.
Hoverwatch allows you to filter call logs based on:
- The type of call (Phone or Chat call)
- The direction of the call (Incoming or Outgoing)
Regarding the type of call, Hoverwatch can detect the actual application that initiated a call. As such, it will categorize a WhatsApp call under “Chat Calls” while normal calls will fall under “Phone Call”.
Additionally, Hoverwatch also includes a search bar that lets you find specific call records even quicker. You can simply type a number and get results on the spot.
On the other hand, it is worth mentioning that the call recording quality is superb. We could clearly hear everything from a conversation despite using the medium setting.
Contacts
If gaining access to the target’s contact list was your priority, Hoverwatch still comes to the rescue. You can access the contact list in two ways too:
- By clicking “Contacts” from the main menu
- By selecting it from the drop-down list under “Reports”
Both will ideally show you the same results, but the one from the menu is neater.
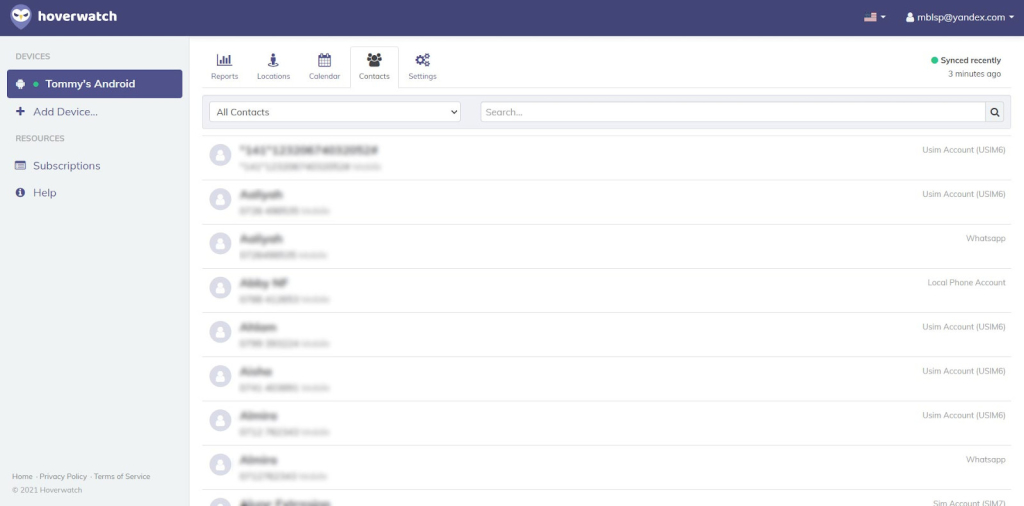
The layout here is pretty simple and self-explanatory too. Hoverwatch includes a drop-down button that lets you choose contact groups as they appear on the target’s phone.
As such, you can choose to view individual contact groups such as:
- SIM contacts
- Phone contacts
- WhatsApp contacts
- Google account contacts
On top of that, the handy search bar can also help you find a specific contact. You can type the name or number to see if it exists in the target phone’s contact list.
One other thing we noted about the Contacts feature is that it takes a while to populate. This is especially true if you just set up Hoverwatch for the first time.
However, the entire contact list did populate on the second data upload process.
SMS & MMS
Things start getting interesting when you get to Hoverwatch’s SMS & MMS feature. And that’s because its screenshot-based style of tracking kicks in here.
Just like the previous sections, the SMS & MMS section also features a handy filter option. This lets you go to particular SMS records a bit faster.
In specific, you can filter SMS records according to:
- Date
- Direction (Incoming or Outgoing)
- The method it was taken (With or Without Screenshots)
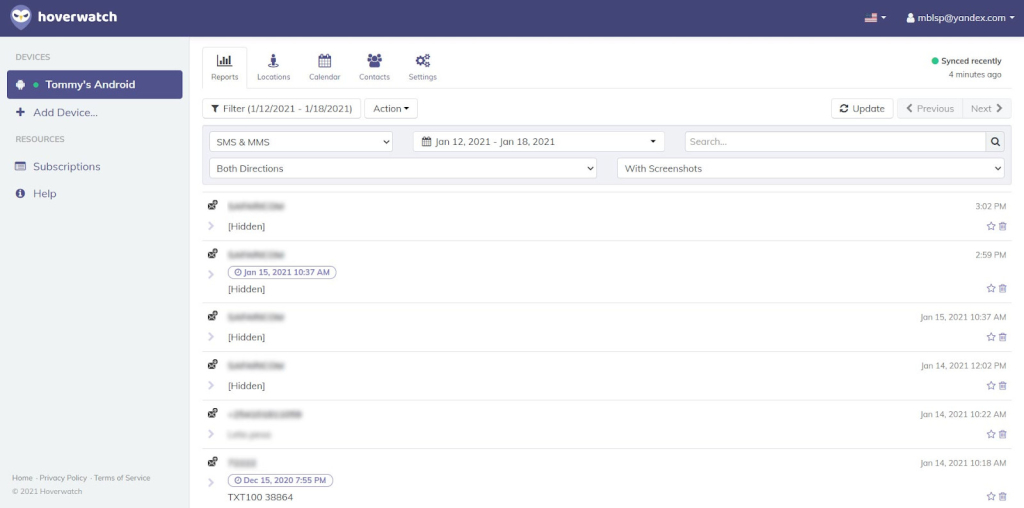
For the date and direction, it’s pretty self-explanatory. You simply set the direction and select a period to see all monitored text messages that interest you.
But the screenshot feature gives you a little more data. You’ll not only get to read the text messages sent but also see a snapshot of other conversations too.
This can be really helpful if you’re tracking the target’s full activities on text. Nevertheless, Hoverwatch doesn’t always take a screenshot of every SMS chat.
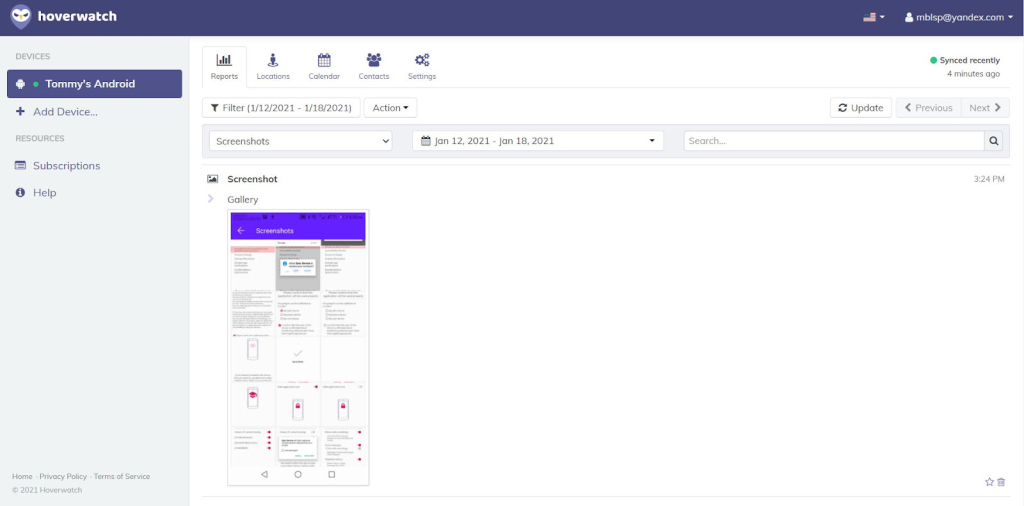
Screenshots and Unlock Selfies
As a screenshot-based monitoring app, Hoverwatch does excel at taking screenshots and unlock selfies.
In fact, there was no single time the app failed to take an unlock selfie once I entered my PIN. And more often than not, that selfie would always show my face clearly.
Though both the screenshot and unlock selfie feature work in the same way, unlock selfies have something extra. They also capture the GPS coordinates of the device.
As such, this can be helpful if your child lost the phone and you’re trying to locate it. What’s more is that you can also use this feature in conjunction with others like location tracking.
Screenshots, on the other hand, were taken almost randomly, and especially when opening an app for the first time. This also gives you an opportunity to view activities in other unrelated apps such as video games.
Websites
Even in the websites section too, Hoverwatch’s screenshot-taking feature still has a lot to add. And in many good ways.
The app will record a few activities that take place in the target device’s mobile browser. They may include things like:
- Search queries made
- Websites visited
But while the actual link to the site is the primary interest, you can also gather lots more data. For instance, the screenshots alone can reveal the number of tabs that are opened on the target phone’s browser.
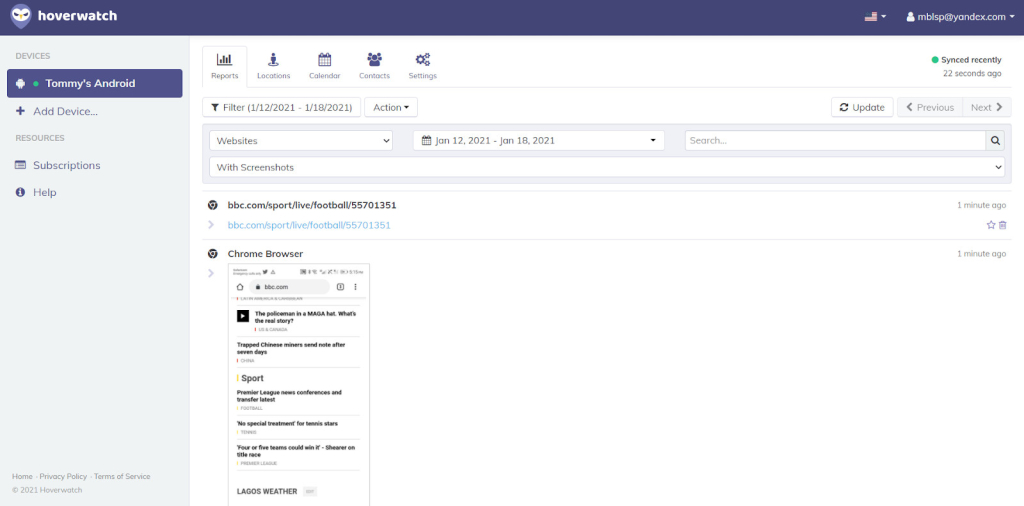
Sadly, not all screenshots will be useful. This is because Hoverwatch occasionally took screenshots before the web page itself had fully loaded.
Additionally, the search queries also give you an insight into what they were searching for. And even the queries themselves have timestamps too.
Hoverwatch will also pick up websites visited from other browsers as well. And it will then categorize the browser under “Websites”.
Gallery
The gallery feature was equally impressive. But not simply because you can filter media files by date.
Uploads were generally fast even when using mobile data. And this is a big bonus since it means that Hoverwatch will use less data to upload media files.
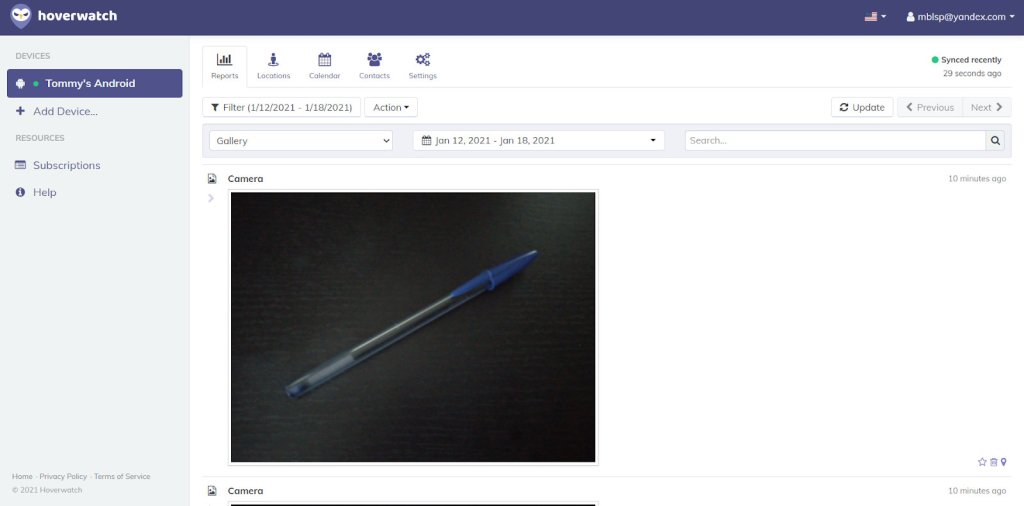
Hoverwatch seemingly compresses media files before uploading them to the server. This saves on bandwidth and reduces upload times too.
As an example, the photo of the pen from the screenshot above was 2.83MB. But Hoverwatch compressed it to a mere 152KB!
SIM Card Change
Any changes in the SIM card will also be recorded. And Hoverwatch will also take note of the new operator.
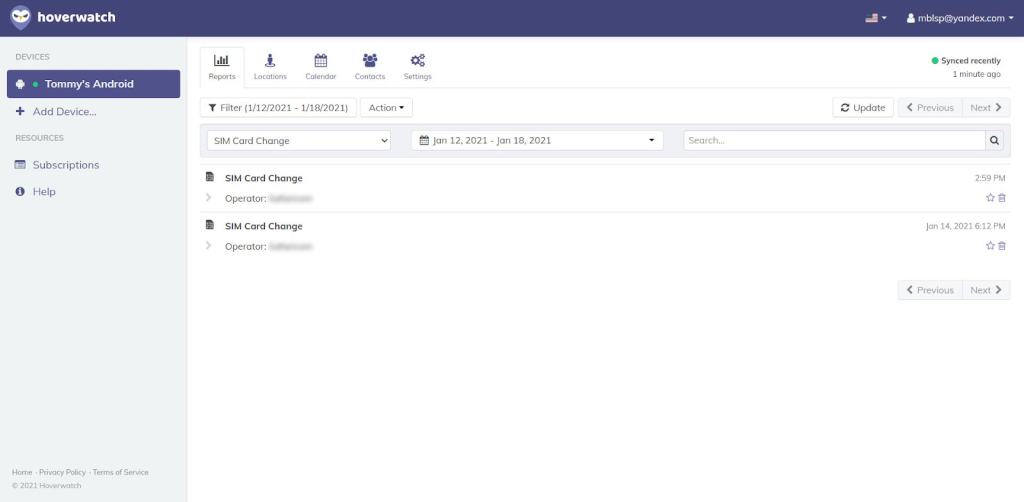
This feature would be helpful if your child loses his/her device. That’s because you can still find out lots of information about the person who stole the device.
But sadly, the SIM Card Change feature wasn’t always that accurate. On some occasions, it indicated that there was a SIM change when there wasn’t.
Locations
GPS location tracking is also possible with Hoverwatch’s GPS feature. And while there’s no screenshot-recording feature here, Hoverwatch still does a good job of tracking a target’s every move.
The interface here is pretty simple. You’ll see a map with all the locations that a target has been visiting.
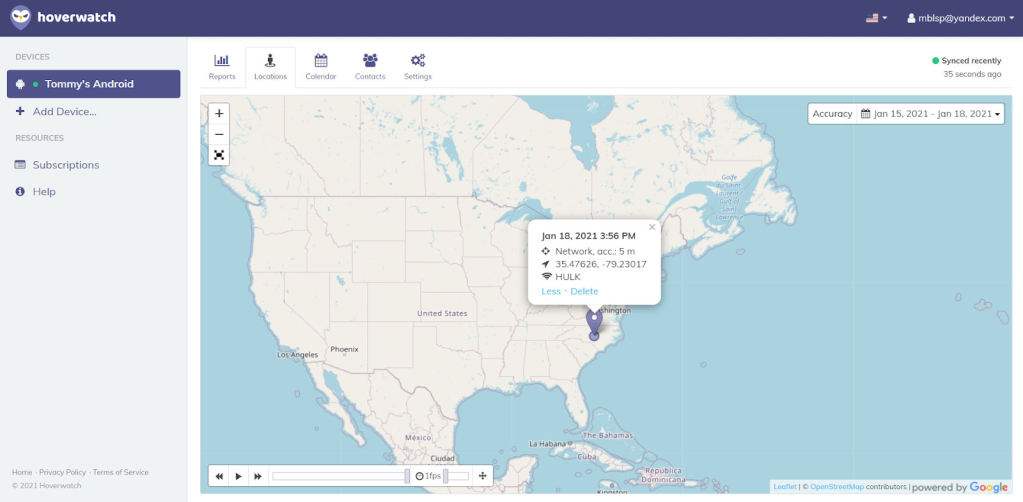
However, on clicking any one location/point, Hoverwatch will reveal a few more details like:
- The date
- The Wi-FI SSID
- The approximate distance of the target from the Wi-Fi signal
We took the distance approximations with a grain of salt though. That’s because it always read 300M even when standing right next to the router.
But regardless, the GPS locations were pin-point accurate. And this made a few more things possible.
At the bottom of the map, Hoverwatch includes a simple slider that lets you track the target’s movements. By sliding it forward or back, you’ll be able to see all locations the target visited in order.
Calendar
If you’re also interested in viewing your target’s schedules, then the Calendar is the place to be. Hoverwatch will also monitor all records kept on the calendar.

The best part is that even on the dashboard, it gives you an easy to navigate calendar view. Thus, you can see any future plans that the target intends to execute.
Settings
Hoverwatch’s settings don’t necessarily go down as a feature per se. But with the wide array of options it has, it would be almost folly not to talk about them.
There are lots of things you can change on Hoverwatch’s settings page. And most dictate the kind of information you’ll be able to monitor at the end of the day.
This includes:
- Device information
- Data upload settings
- Location settings
- Call settings
- Screenshot settings
- Optional features
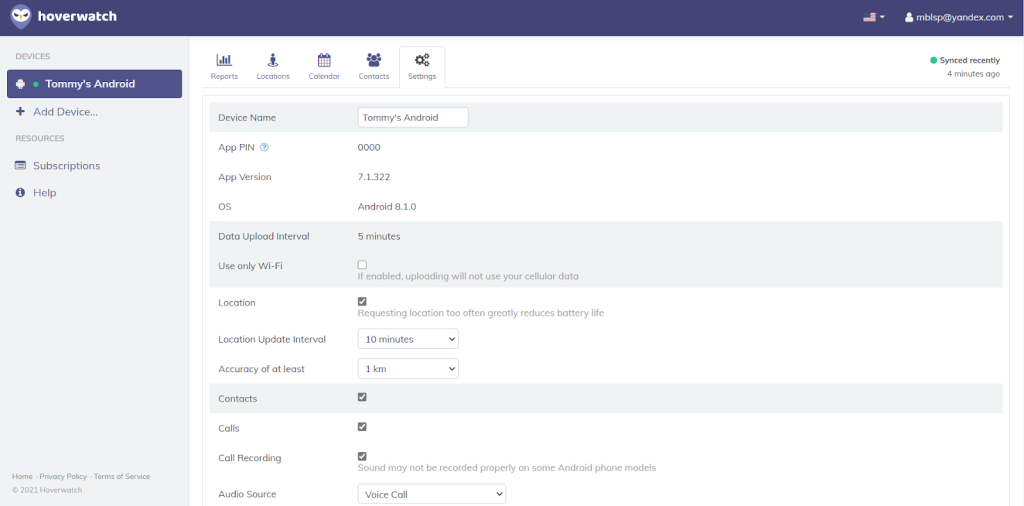
Device Information
This lets you set the name of the mobile phone or device as it will appear on Hoverwatch’s dashboard. But in addition, you can also see helpful information such as:
- The OS
- The App PIN
- The App Version
Data Upload Settings
You can choose whether data should be uploaded using Wi-Fi alone. Enabling this prevents the Hoverwatch app from using cellular data.
In addition, if you’re using a rooted Android, you may be able to change the data upload interval. But the default interval of 5 minutes works pretty well.
Location Settings
Here too, you can define a few rules like:
- The location update interval
- The minimum accuracy
The default setting for both of the above is 10 minutes and 1KM respectively. However, you can choose lower values like a location update interval of 5 minutes.
But bear in mind that requesting location information too often can reduce battery life. And this can easily alert the target.
Call Settings
There are quite a bunch of things you can dictate here too besides simply turning off the feature. Hoverwatch lets you change things like:
- The audio source
- Voice enhancement feature
- The recording quality
When using the call recording feature, the audio source lets you pick what should be recorded. You can have it record when there’s a voice call or when it detects a voice.
In addition, you can also have it record the microphone alone. And here is where the voice enhancement feature helps especially if recording volume is low.
Recording quality is also important if you want an ultra-clear HD quality. By default though, Hoverwatch uses the medium quality. And it was quite good.

Screenshot Settings
Hoverwatch only allows you to select the screenshot capture interval. You can simply leave the default value of 5 minutes though.
Optional Features
Practically almost everything can be turned on or off from the settings page. You can choose whether Hoverwatch should monitor things like:
- Unlock selfies
- Screenshots
- Gallery files
- Sim card changes
- Contacts, etc
And that can be done easily by unchecking the box next to the feature and saving your changes.
Pricing Plans
Hoverwatch offers a simple pricing plan that is based on its three main subscription plans: Personal, Professional, and Business.
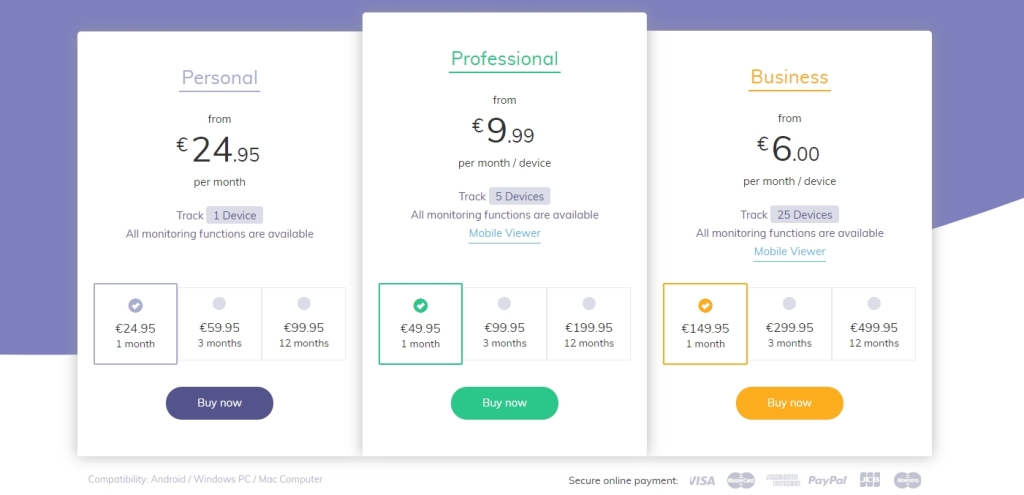
The costs differ based on the plan and the subscription period too. However, what truly sets them apart is the number of devices you can monitor under each plan.
With the personal plan, you can only monitor 1 device. But the professional plan lets you monitor 5 devices. The business plan can allow you to track up to 25 devices.
In addition, the professional and business plan also let you use the Hoverwatch Viewer (HW Viewer). This is simply an Android app that operates log entries from all your tracked devices.
How to Install Hoverwatch
If you’re wondering how to install Hoverwatch, the process is easy. Installing and setting up Hoverwatch is the second thing you’d want to do before you can monitor your kid’s device. But the process will be different depending on the OS.
As such, in this section, we’ll talk about how to install and setup Hoverwatch on:
- Android
- macOS
- Windows
How to Install Hoverwatch on Android
Getting started with installing Hoverwatch on Android is straightforward and easy. But it requires you to have access to the target device and a valid subscription plan.
Prepare the Target Device
Before you can install Hoverwatch on your child’s target Android device, there are a few important settings to make. And they involve Google’s Play Protect.
To get started on the preparation, here’s what you need to do on the mobile phone:
Step 1: From your app drawer, locate and tap to open the “Play Store” app.
Step 2: Tap on the hamburger menu icon on the top left part of the page to view Play Store’s menu.
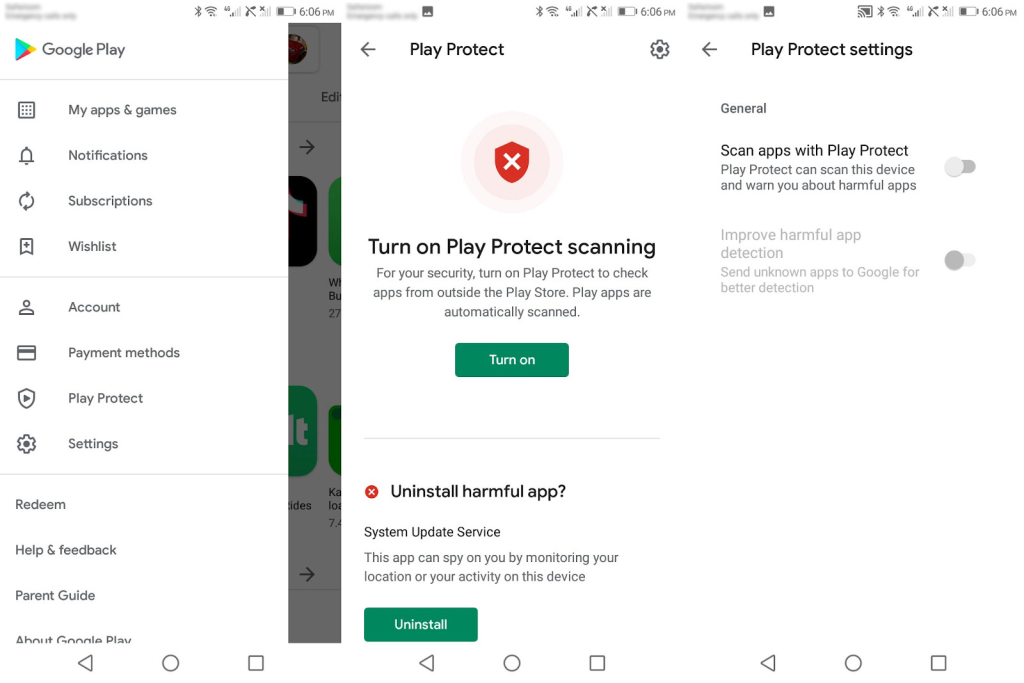
Step 3: Click on “Play Protect” from the menu to go to the “Play Protect” page.
Step 4: Once on the page, tap on the little gear icon on the top right part of the screen to access “Play Protect Settings”
Step 5. Ensure that both options under “Play Protect Settings” are disabled.
Download and Install Hoverwatch
The next main step is to download the Hoverwatch app on the target device before you can start monitoring it. But that requires a Hoverwatch account and a valid subscription.
Thus, here’s what you should do next:
Step 1: On the target phone, open any web browser (Chrome preferably) and type in hoverwatch.com then hit enter.
Step 2: Tap on the “Sign up free” button and enter your email and password of choice in the form you’re presented to create a free account.
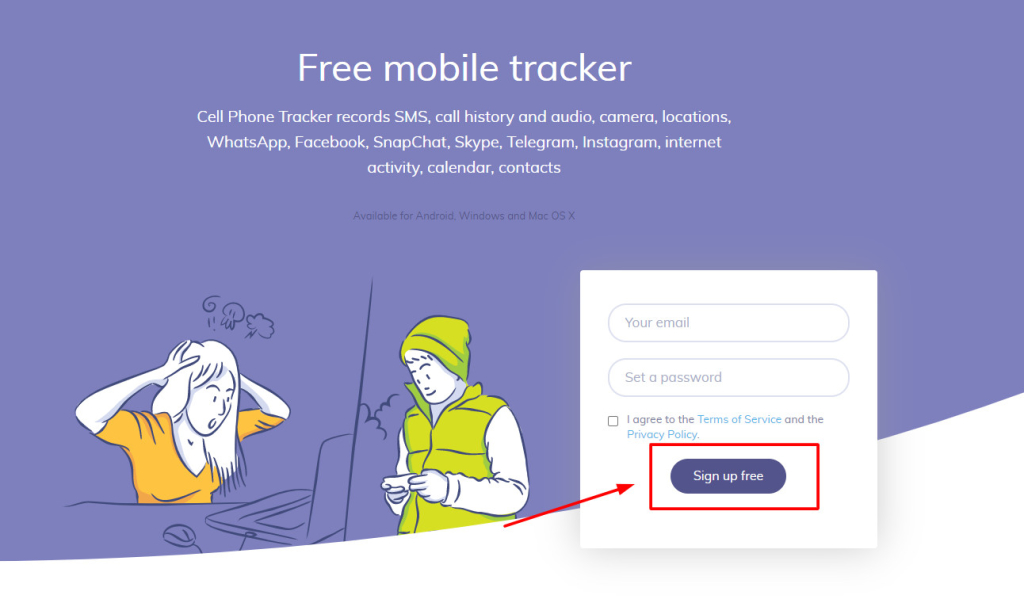
Step 3: Proceed to selecting a subscription plan of your choice and paying for it once logged in.
Step 4: From the main menu on the left part of the dashboard, click on “Add Device” then select the Android tab.
Step 5: Under the Android tab, click on the link under “Download App” to download the Android version of Hoverwatch.
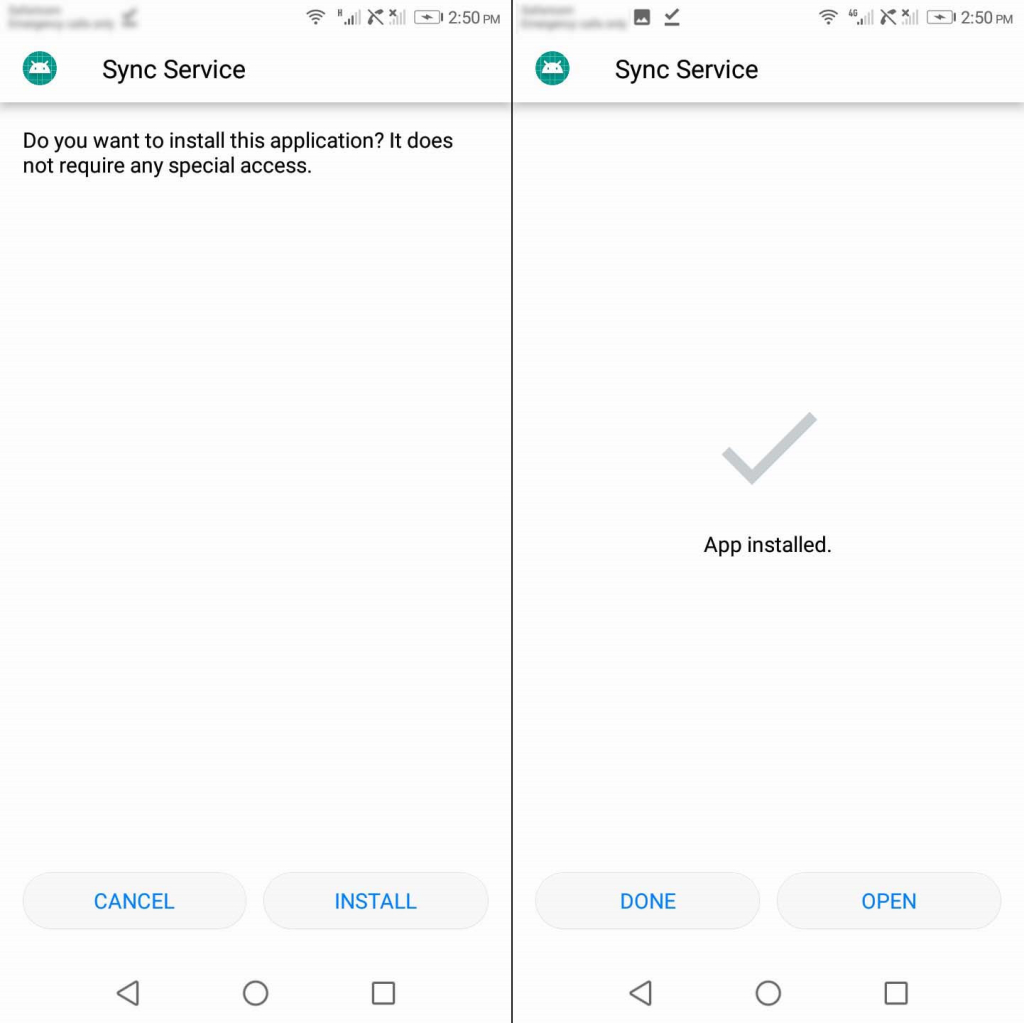
Step 6: Once downloaded, tap open the Hoverwatch APK download for Android and click on “Install” to proceed with installation. Tap on “Open” once installation is complete.
Complete the Setup Wizard
Installing Hoverwatch on the target device is only part of the process. You’ll now need to set it up by granting it the necessary permissions it needs to work.
Here’s how to do that:
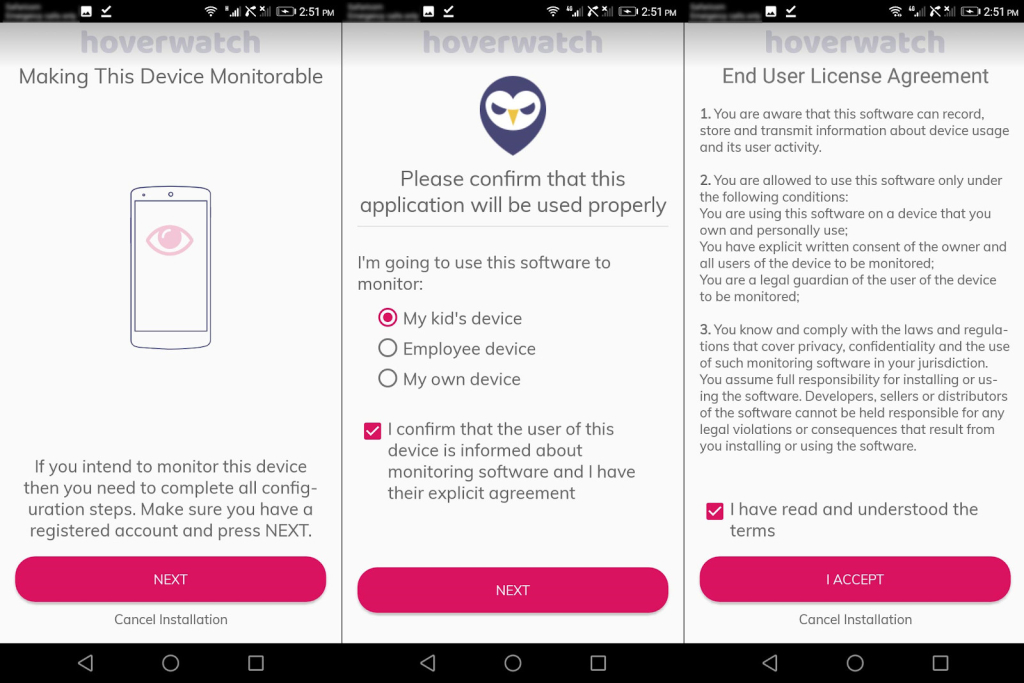
Step 1: After opening the newly installed Hoverwatch app, it will ask you to make the device monitorable. Tap on “Next” to proceed.
Step 2: Choose how you intend to use the app on the target device and check the confirmation box at the bottom. Tap on “Next” again to proceed.
Step 3: Tap on the checkbox on the End User License Agreement to accept the terms and proceed to the “Application Requirements” setup page.
Step 4: Turn on “Basic Permissions” and then tap “Allow” in the pop-ups that appear on your screen. This will give Hoverwatch all basic permissions.
Step 5: Next, turn on “Accessibility Service” then tap “Ok” on the pop-up screen that appears. This will take you to the Accessibility page.
Step 6: On the accessibility page, tap on “Sync Service”, turn it on, then click on “Ok”. Tap the back button to return to the setup wizard.
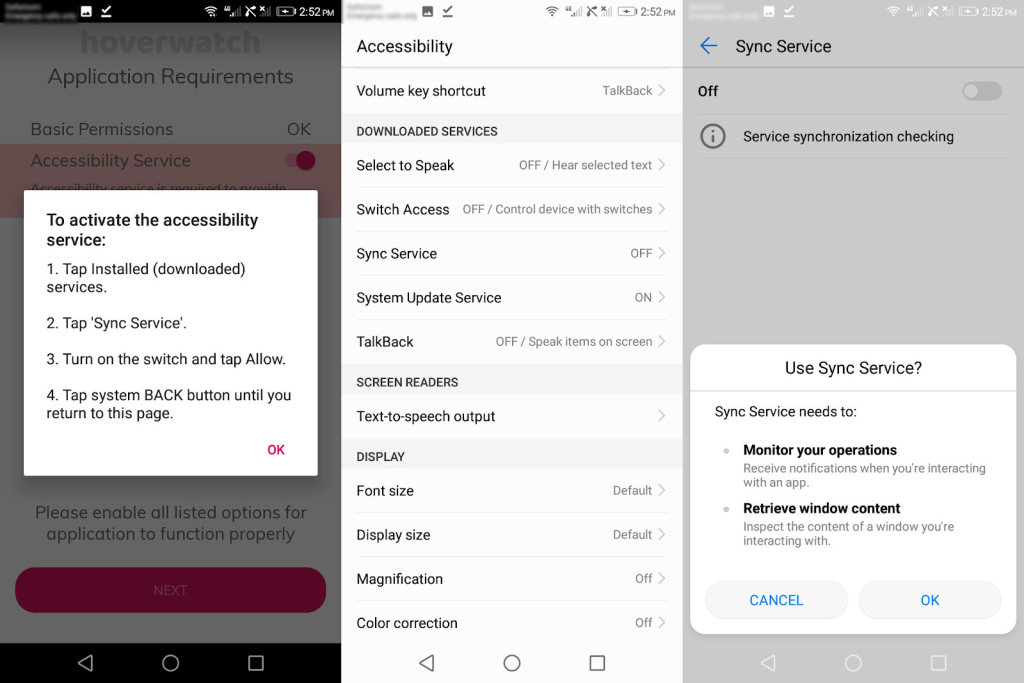
Step 7: Turn on “Access to Usage” then tap on “Ok” on the pop-up that appears immediately after.
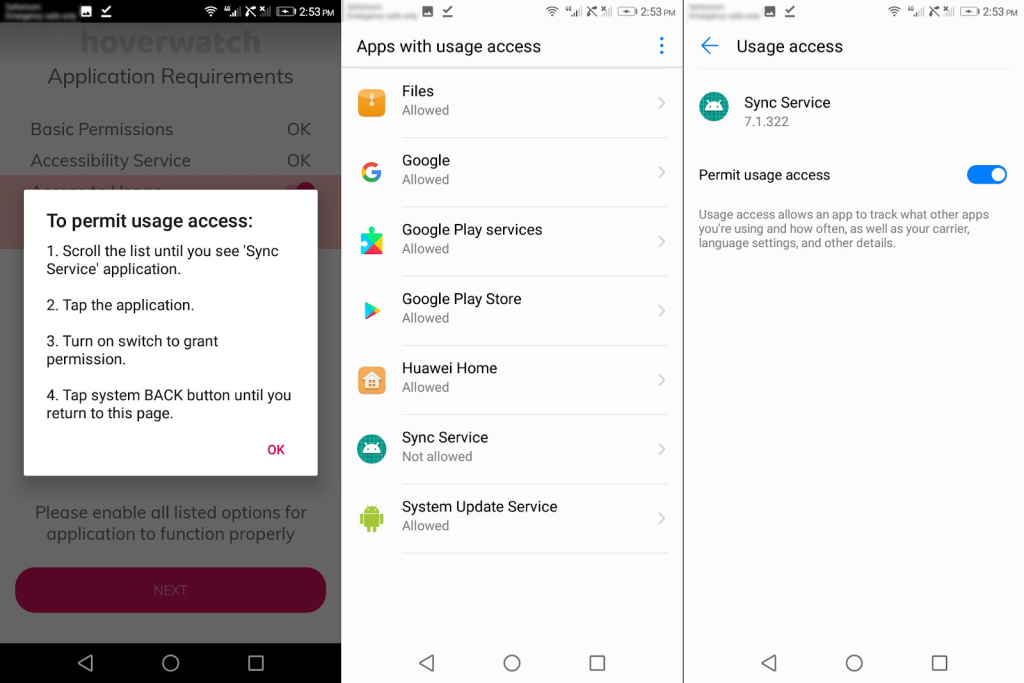
Step 8: Click on “Sync Service” then turn on the switch in the Usage access page to grant access. Tap the back button to return to the setup wizard.
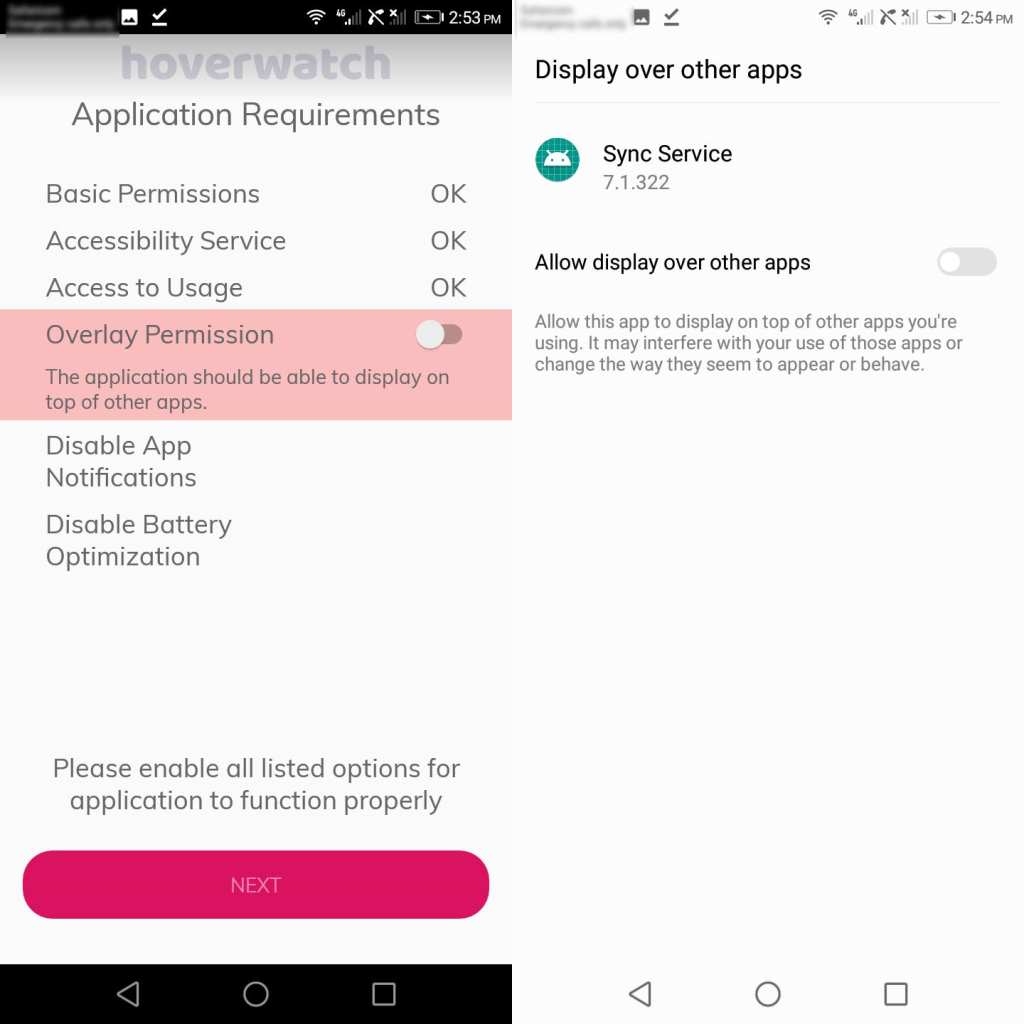
Step 9: Turn on “Overlay Permission” and turn on the switch in the “Display over other apps” page.
Step 10: Turn on “Disable App Notifications” then tap on the “Ok” button in the pop-up that follows. Proceed to turn off notifications and then tap the back button.

Step 11: On the “Application Requirements” page, turn on “Disable Battery Optimization” and tap “Allow” on the pop-up that follows. Tap next once all requirements are complete.
Step 12: Activate the app by entering your Hoverwatch credentials then tap on “Activate” to log in.
Step 13: Select the activities you wish to track on the target device and click “Next” to proceed to the end.

Step 14: Once configuration is complete, Hoverwatch will ask whether you want to set up your pin. If so, click “Change pin” or simply click next.
Step 15: Click on “Finish Installation” once you’ve completed everything.
Tweak Additional Settings
Depending on the target device model, there may be some additional settings to complete. However, they are all about the power usage settings.
You can find out more information about this process from here.
How to Install Hoverwatch on macOS
Setting up Hoverwatch on a Mac is pretty simple compared to Android. All you really need to do is install the Hoverwatch app and start monitoring. Remember that Hoverwatch for iPhone doesn’t exist, it’s only compatible with macOS
As such, here are the steps to follow:
Step 1: Navigate to Hoverwatch’s website and click on “Sign up free” to create an account.
Step 2: Once logged in, proceed to select a subscription plan of choice then make a payment for your account to be activated.
Step 3: From the left sidebar menu, click on “Add Device” then select the “macOS” tab.
Step 4: Click on the download link to download the zip archive containing the Hoverwatch application for macOS.
Step 5: Run the application then key in your Hoverwatch credentials and click “Install”. Type your Mac admin password also when requested.
Step 6: Click on “Finish” to finalize installation and Hoverwatch will close and run in the background.
Installing Hoverwatch on Windows
The case here is almost the same as with macOS. But the only real difference is that you’ll be downloading Hoverwatch’s Windows application.
To get started, this is what you should do:
Step 1: Go to Hoverwatch’s website and click on “Sign up free” to create a free Hoverwatch account.
Step 2: After registration, select a subscription plan of your choice then make a payment for your account to be activated.
Step 3: From the left sidebar menu, click on “Add Device” then select the “Windows” tab.
Step 4: Click on the download link to download the zip archive containing the Hoverwatch application for Windows. Note the archive’s password too.
Step 5: Open the archive and key in the password to first unzip it.
Step 6: Click “Yes” in the Windows User Account Control window that will pop up to allow installation.
Step 7: Proceed with the setup by choosing what you’ll use the software to monitor then click “Next”.
Step 8: Read Hoverwatch’s license agreement then click “Next” again to proceed.
Step 9: Enter your Hoverwatch credentials then tap on “Activate”.
Step 10: Click on “Finish” to finalize installation and Hoverwatch will close and run in the background.
Pros and Cons
As it is feature-packed, Hoverwatch does come with plenty of features. But it also fell short in some places too.
- Simple to install and use
- No rooting required
- Android settings can be easily tweaked from Hoverwatch’s dashboard
- Data upload frequency is high
- Clear call recordings
- It takes plenty of screenshots of all phone activity
- Not easy to navigate
- Keylogger comes separately
- No geo-fencing
- SIM card change is not always accurate
Can Hoverwatch Be Detected?
In simple words — no! And this is what makes this app the best tracking and monitoring tool. It can work in stealth mode without letting the mobile user know. So if you ever think about how to find Hoverwatch on your phone, you’ll never have to worry about it.
All you need to do is hide the icon, and the target mobile user won’t be able to detect it even in the list of installed apps.
Is Hoverwatch Legit?
If you’re wondering is Hoverwatch legit, the app lives up to its word as a stealthy phone tracking app. In addition, you’d be happy to know that thanks to its working mechanism, all features work flawlessly.
Purchasing a subscription and installing it on the target phone is all you really need to do to get started.
Is Hoverwatch Safe?
Yes, Hoverwatch is a safe and reliable spy app that you can use to monitor your kids, employees, or even partner. It offers a bunch of different monitoring features and can be set to operate in Stealth Mode so the target will never know about its presence on their phone.
Do I Need to Root My Phone to Use Hoverwatch?
Root access is not required to use Hoverwatch. In fact, all of Hoverwatch’s features are at your disposal regardless of whether you’ve rooted your phone.
However, Hoverwatch will provide a few extra settings for a rooted Android. This is specifically for users who want to change the location update interval.
Is Hoverwatch Free?
Sadly, Hoverwatch is not free and neither does it offer any free plans. The only way to use it is by first getting a valid subscription.
However, it claims to offer a 3-day free trial. In order to get the Hoverwatch free trial you will have to contact their support team and if it works out, it’s one of the best phone spying apps for Android in the market.
How Often Does Hoverwatch Update Data?
Hoverwatch updates data after every 5 minutes by default. It also updates locations after every 10 minutes to save on battery.
However, you can specify the data upload interval if the target phone is rooted. But take care not to choose a short interval as this may drain the battery faster.
Final Take
Ultimately, we were impressed with everything Hoverwatch had to offer. From its unique screenshot-based tracking style to its simple installation process, the app does deserve lots of credit.
While it fell short in some areas, few spy apps can still compete at its level. And it is this that undeniably makes it one of the best phone monitoring apps on the market.

Can you see incoming and outgoing Facebook messages with out rooting by just using the hidden app. Also does this record calls.
Yes, it does both!
How does one install on device you want to monitor?
There are two ways:
1) install Hoverwatch remotely: you’ll need iCloud credentials for this. Install Hoverwatch from the app store and you’re good to go.
2) physical access: get the phone and install the software.
I need this for a personal reason. I need to see my gf’s whatsapp and skype activities and messages, because we live in different towns now. I hope this app can help me without me having to get her phone.
Thanks
I have used an monitoring app to keep eye on my kids phone, however with previous app when my daughter turned off location a notification came up informing them the app wash using location. Is this something you have heard anyone mentioning about hoverwatch?
This shouldn’t be the case. There is a way to turn it off, you can read it in the FAQ.
There was a notion thru my login regarding the monitoring phone…. **You have not granted the program on Samsung Galaxy Note9 the requested permissions to send the selected logs [All Screenshots]. Open the program on the monitored device [how to open], carefully read the program messages and grant the requested permissions [details]……
What does this mean? Has the monitor phone located Hoverwatch?
You just need to give the app access rights on the phone.
Even when I have access to the target phone (not always easy) and I have basically regranted the permission to capture All Screenshots even then it only works for couple of days and then the message reappears that “**You have not granted the program on Samsung Galaxy Note9 the requested permissions to send the selected logs [All Screenshots]. Open the program on the monitored device [how to open], carefully read the program messages and grant the requested permissions [details]……
This is a major issue with hoverwatch, unfortunately.
I want to use this app to someone whose in another country. I don’t have physical access to their phones and their using Android.. how do i go about it?
Can the app be detected in the app list?
You can, but it’s going to be hard because it’s masked as an Android service.
I want to try out a spy app that’s super easy to install and will not be detected cause if my bf found out he would be livid. He is a little tech savy so if I’m gonna do this it has to be something absolutely undetectable and does not require rooting or jailbreaking cause I hear that these things can potentially damage the phone. I would like to have access to WhatsApp and Facebook messenger, his texts, videos, pictures, and be able to monitor phone calls as well. I cannot get caught by him. Please help. He has Android.
Cocospy is completely hidden and is what you’re looking for. Another option is to try Umobix, these are both newcomers and are completely hidden.
I need to find an easy way to hack my boyfriend’s whatsapp with only using his telephone number. Can you advise of the best way please?
Install this app on his phone and follow him through the control panel, it’s that easy 🙂
Can I see incognito browsing history in this app.
Yes, you can!
Why does the “start sync” box pop up every other day on the target phone? It makes people suspicious
Have you checked out their manual? Might be an answer there.
Target phone does not sync with their cellular data. Even then I did not select the WiFi only option
My account is only showing YouTube and it’s no longer showing WhatsApp conversations because I’ve been getting messages from him but not loading onto the hover watch reports since this morning can you let me know if there is a glitch right now
Hey can i install hower watch keylogger in same phone again after deleting first one
Yes, that’s possible.